
Chocolate Cottage Cheese Ice Cream (High Protein & Creamy – Easy 5-Minute Recipe)
Make the best Chocolate Cottage Cheese Ice Cream with just a few simple ingredients. This creamy, high-protein, no-churn dessert is healthy, rich, and ready in minutes.
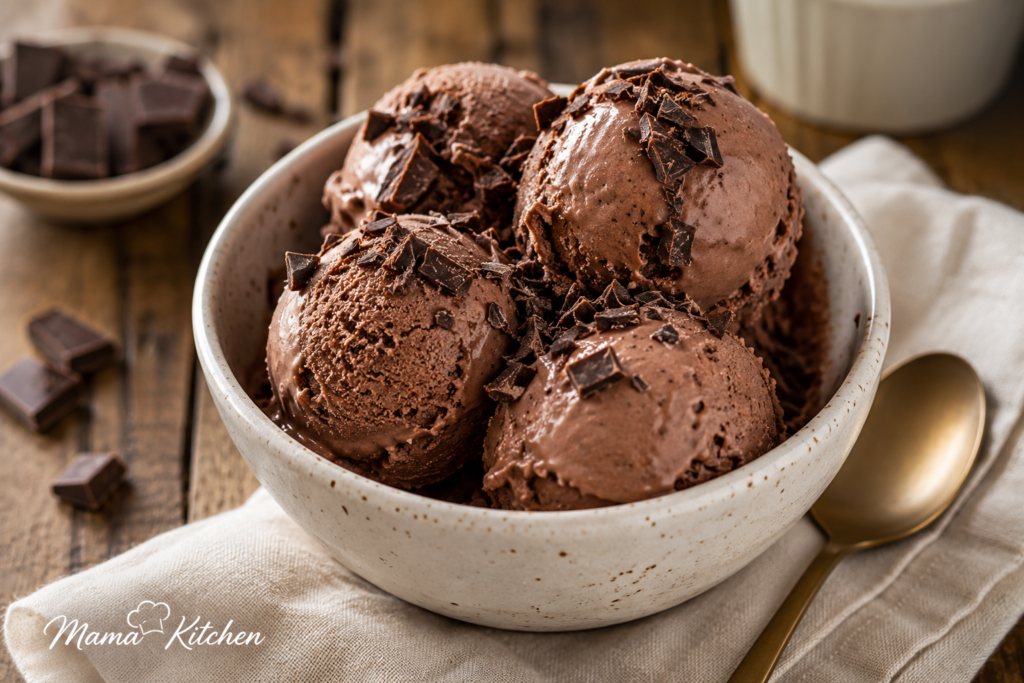
Introduction
There are so many options but If you told me a year ago that cottage cheese would become my favorite ice cream base, I would have laughed. But here we are. This chocolate cottage cheese ice cream is rich, creamy, and tastes like a scoop of fudgy chocolate soft serve, yet it’s packed with protein and made without an ice cream maker.
I started making this recipe on nights when I wanted something sweet after dinner but didn’t want to undo a day of healthy eating. It turns out blending cottage cheese into chocolate ice cream is one of the easiest tricks in the healthy dessert world. You get that same cold, creamy, chocolatey bite you’d get from a pint at the store, minus the sugar crash and the guilt.
This isn’t a “diet food pretending to be dessert” situation either. It genuinely tastes good. My kids ask for it. My husband, who claims he “doesn’t like healthy desserts,” finishes his bowl every time. That’s really the whole point of this blog: real food that real families actually want to eat.
Let’s get into why this recipe works so well, and exactly how to make it at home tonight.
Why You’ll Love This Chocolate Cottage Cheese Ice Cream
There’s a lot to love here, but let me hit the highlights first.
It’s genuinely a high protein chocolate ice cream, thanks to the cottage cheese base, so it’s a smart after-workout treat or a way to sneak more protein into your day without another shake.
It comes together in about 10 minutes of actual hands-on work. No cooking, no custard, no tempering eggs. Just blend, sweeten, freeze.
It’s naturally lower in sugar than most store-bought pints, so if you’re watching added sugar for yourself or your kids, this is a welcome swap.
You can control every single ingredient. No gums, no fillers, no mystery stabilizers. Just real food.
And honestly? It’s just fun. Something about blending cottage cheese into smooth chocolate cream feels like a kitchen magic trick, and the first time you taste it, you’ll probably be surprised too.
What Makes Cottage Cheese Perfect for Ice Cream?
I get this question a lot, so let’s talk about it honestly.
Cottage cheese has a naturally creamy, slightly tangy texture that, once blended smooth, behaves a lot like a soft cheese or Greek yogurt base. When you blend it thoroughly (this step matters, I promise), the curds disappear completely and you’re left with a silky, thick liquid that’s ideal for freezing into ice cream.
It’s also loaded with protein and calcium, which is more than you can say for heavy cream. A cup of cottage cheese has significantly more protein than the same amount of heavy cream or milk, which is exactly why this has become such a popular base for protein ice cream recipes lately.
The tang from the cottage cheese also does something clever: it balances the sweetness of the chocolate, the same way a pinch of salt or a splash of buttermilk does in baking. You get depth of flavor instead of one-note sweetness.
If you want to dig deeper into the nutrition side of things, the USDA FoodData Central database has detailed breakdowns of cottage cheese’s protein, fat, and calcium content, and it’s a great resource if you like to nerd out on nutrition facts like I do.
And if you loved the idea of cottage cheese desserts, you’ll want to check out our High Protein Cottage Cheese Ice Cream too, which is the vanilla version of this same method.
Ingredients
Here’s everything you need. Most of it is probably already in your kitchen.
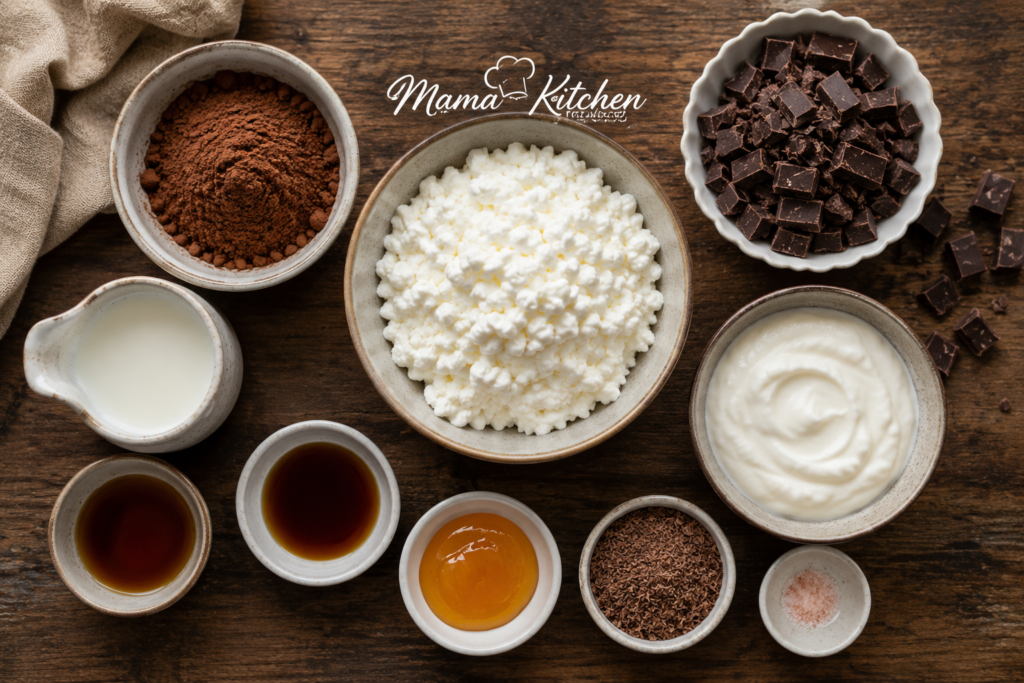
| Ingredient | Quantity | Purpose |
|---|---|---|
| Cottage cheese (full-fat or 2%) | 2 cups | Creamy, protein-rich base |
| Unsweetened cocoa powder | 1/3 cup | Deep chocolate flavor |
| Milk (dairy or unsweetened almond) | 1/4 cup | Thins the mixture for a smooth blend |
| Honey or maple syrup | 1/3 cup | Natural sweetness |
| Vanilla extract | 1 tsp | Rounds out the chocolate flavor |
| Salt | 1/4 tsp | Balances sweetness, boosts flavor |
| Dark chocolate chips (optional) | 1/4 cup | Adds texture and melty chocolate bites |
| Cornstarch or 1 tbsp cream cheese (optional) | 1 tsp | Helps prevent ice crystals for a softer texture |
Feel free to swap honey for maple syrup if you want this dairy-forward and refined-sugar-free, or use a sugar-free syrup if you’re watching carbs closely.
Equipment Needed
You don’t need anything fancy for this one. Here’s what will help:
- A high-speed blender or food processor (this is non-negotiable for a smooth texture)
- A rubber spatula
- A freezer-safe loaf pan or airtight container
- Parchment paper (optional, but helpful for easy removal)
- A hand mixer, only if you’re folding in chocolate chips by hand
Step-by-Step Instructions
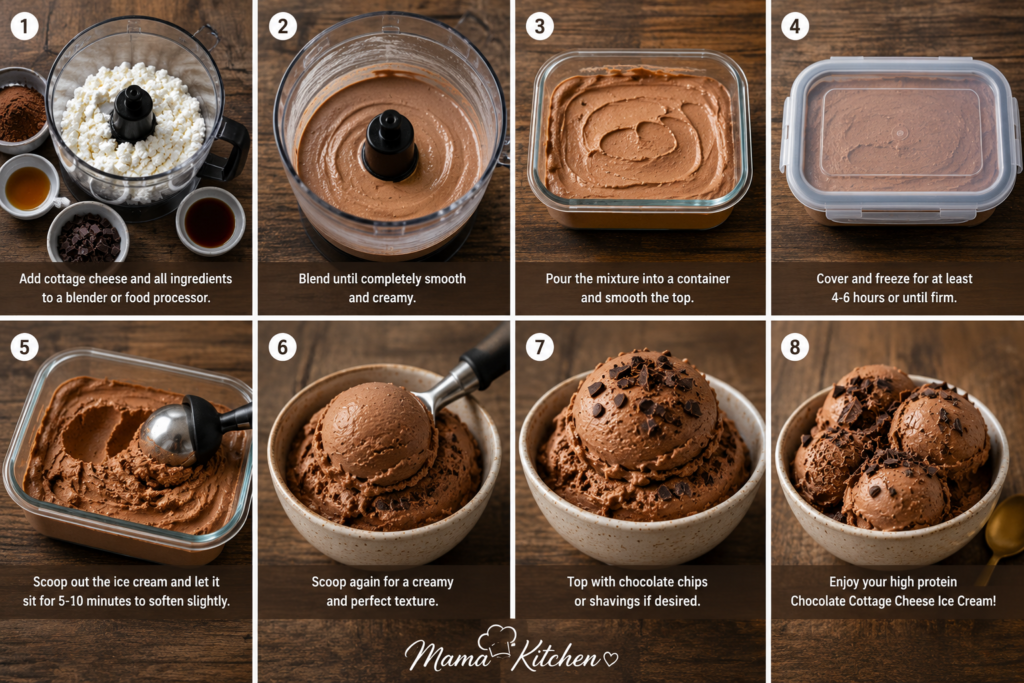
Step 1: Blend the Cottage Cheese Until Completely Smooth
Add your cottage cheese to the blender first, on its own, and blend for a full 60 to 90 seconds. This step is the secret to good cottage cheese ice cream. If you rush it, you’ll end up with a grainy texture instead of that silky-smooth soft serve consistency.
Tip: Scrape down the sides halfway through blending to make sure no curds are hiding at the bottom.
Common mistake: Skipping this step and adding all the ingredients at once. Cottage cheese needs time alone in the blender to break down completely before it can absorb other flavors smoothly.
Step 2: Add the Cocoa Powder, Sweetener, and Vanilla
Once your cottage cheese is smooth, add the cocoa powder, honey (or maple syrup), vanilla extract, and salt. Blend again until everything is fully combined and the color turns a deep, even chocolate brown.
Tip: Taste the mixture here. If you want it sweeter or more chocolatey, this is the moment to adjust, not after it’s frozen.
Common mistake: Using natural cocoa powder and Dutch-processed cocoa powder interchangeably without checking. Dutch-processed cocoa gives a smoother, less acidic flavor, which many people prefer for ice cream.
Step 3: Thin the Mixture with Milk
Pour in the milk slowly while the blender runs on low. You’re looking for a texture similar to a thick milkshake, pourable but still rich.
Tip: Add the milk gradually. It’s easier to thin the mixture more than to fix one that’s too runny.
Common mistake: Adding too much milk at once, which can water down the flavor and make the ice cream icy once frozen.
Step 4: Fold in Chocolate Chips (Optional but Recommended)
If you’re using chocolate chips, pour your mixture into a bowl and gently fold them in with a spatula. This keeps them evenly distributed instead of getting pulverized by the blender blades.
Tip: Freeze the chocolate chips for 10 minutes beforehand so they don’t melt into the mixture.
Common mistake: Blending the chips in with everything else, which turns them into streaks instead of little chocolate bites.
Step 5: Pour into a Freezer-Safe Container
Transfer your mixture into a loaf pan or shallow airtight container. A shallow, wide container helps the ice cream freeze more evenly and makes scooping easier later.
Tip: Line the pan with parchment paper for easy removal if you plan to slice it instead of scoop it.
Common mistake: Using a deep, narrow container. It takes longer to freeze and often ends up icy in the middle while soft on the edges.
Step 6: Freeze for 4 to 6 Hours
Cover the container tightly with plastic wrap, pressing it directly onto the surface of the ice cream to prevent ice crystals. Freeze for at least 4 hours, though overnight is even better for a firmer scoop.
Tip: Stir the mixture once after about 1 hour of freezing. This “semi-churns” it and helps break up any ice crystals before it fully sets.
Common mistake: Skipping the plastic wrap step. Without it, the top layer can develop a frosty, freezer-burned texture.
Step 7: Let It Soften Before Scooping
Once frozen solid, let the container sit at room temperature for 5 to 10 minutes before scooping. This helps it soften just enough for that classic ice cream scoop texture.
Tip: Run your ice cream scoop under warm water between scoops for cleaner, rounder scoops.
Common mistake: Trying to scoop it straight from the freezer. Cottage cheese ice cream freezes a bit harder than regular ice cream because of its lower fat content, so patience here really pays off.
Pro Tips
- Use full-fat cottage cheese for the creamiest texture. Low-fat versions work, but the final ice cream will be slightly less rich.
- Always blend the cottage cheese alone first. This one habit makes the biggest difference in texture.
- A tiny pinch of espresso powder (not enough to taste coffee) makes the chocolate flavor taste deeper and more intense.
- If you want an ultra-creamy, no-churn texture, add one tablespoon of softened cream cheese during blending.
- Don’t skip the salt. It’s a small amount, but it keeps the chocolate from tasting flat.
Flavor Variations
Once you’ve got the base recipe down, it’s easy to switch things up.
Dark Chocolate: Use Dutch-processed cocoa powder and reduce the sweetener slightly for a more intense, bittersweet flavor.
Chocolate Peanut Butter: Blend in 2 tablespoons of natural peanut butter with the cocoa powder for a rich, nutty twist.
Chocolate Mint: Add 1/4 teaspoon of peppermint extract and a few drops of green food coloring if you want that classic mint chip look.
Mocha: Stir in 1 teaspoon of instant espresso powder along with the cocoa for a coffee-shop-inspired flavor.
Double Chocolate Chip: Use both cocoa powder and mini chocolate chips, then drizzle melted dark chocolate over the top before serving.
Storage Instructions
Store your chocolate cottage cheese ice cream in an airtight, freezer-safe container for up to 2 weeks. Press plastic wrap directly against the surface before sealing the lid to help prevent ice crystals and freezer burn.
Avoid storing it in a container with extra air space, since that speeds up ice crystal formation and makes the texture grainy over time.
Freezing Tips
Because this ice cream has less fat than traditional recipes, it can freeze a bit harder. Here’s how to keep it scoopable:
- Store it in a shallow container rather than a tall, deep one.
- Let it sit at room temperature for 5–10 minutes before scooping.
- Stir once during the first hour of freezing to break up ice crystals early.
- If you freeze it in individual portions (like small jars or silicone molds), you can grab single servings without thawing the whole batch.
Serving Suggestions
This ice cream is delicious on its own, but here are some fun ways to serve it:
- Top it with fresh berries and a drizzle of honey for a lighter treat.
- Add a spoonful of natural peanut butter and crushed nuts for crunch.
- Layer it in a jar with granola for a protein-packed parfait.
- Serve it alongside a slice of our High Protein Cottage Cheese Brownies for the ultimate healthy dessert plate.
- Pair a small scoop with a High Protein Greek Yogurt Bark for a fun dessert board when friends come over.
Common Mistakes to Avoid
Not blending long enough. This is the number one reason people end up with grainy ice cream. Give it the full 60–90 seconds alone before adding anything else.
Using low-quality cocoa powder. Since cocoa is the star flavor here, a better-quality cocoa powder really does make a noticeable difference.
Skipping the taste test before freezing. Once it’s frozen, cold temperatures dull sweetness, so what tastes “just right” before freezing often tastes less sweet after.
Freezing in a container that’s too deep. This leads to uneven texture, soft on the outside, icy in the middle.
Not letting it soften before scooping. Patience really does pay off here.
Nutrition Information
Here’s an approximate nutritional breakdown per 1/2 cup serving (based on 6 servings total, using honey and 2% cottage cheese).
| Nutrient | Amount |
|---|---|
| Calories | 110 |
| Protein | 10g |
| Carbohydrates | 12g |
| Sugar | 9g |
| Fat | 3g |
| Fiber | 1g |
| Calcium | 8% DV |
Note: Nutrition values will vary depending on the type of cottage cheese, sweetener, and optional add-ins you use. If you’re tracking macros closely, it’s a good idea to calculate based on your exact brands. For general healthy eating guidance, the American Heart Association offers helpful resources on balancing added sugars and dairy fat in your diet.
Frequently Asked Questions
Can I taste the cottage cheese in this ice cream? Not really. Once it’s blended smooth and combined with cocoa powder and sweetener, the tangy cottage cheese flavor blends right into the chocolate. Most people can’t tell it’s in there at all.
Do I need an ice cream maker for this recipe? No. This is a no churn chocolate ice cream, meaning you just blend and freeze. No special equipment required.
Can I use low-fat or fat-free cottage cheese? Yes, though full-fat or 2% cottage cheese gives you the creamiest texture. Fat-free versions work but may result in a slightly icier finish.
How long does this ice cream last in the freezer? It stays fresh for up to 2 weeks in an airtight container, though it’s honestly best within the first week for the creamiest texture.
Why is my ice cream grainy instead of smooth? This usually happens when the cottage cheese isn’t blended long enough before adding other ingredients. Always blend it alone first for at least 60 seconds.
Can I make this recipe vegan? You can try substituting a dairy-free cottage cheese alternative, though the texture and protein content will differ slightly from the original.
Is this a good post-workout snack? Yes. Thanks to the protein from the cottage cheese, this makes a satisfying post-workout treat that also feels like a reward.
Can kids eat this? Absolutely. It’s a great way to sneak extra protein into your child’s diet while still giving them something that tastes like dessert.
What’s the best sweetener to use if I want it sugar-free? A sugar-free maple-style syrup or monk fruit sweetener works well if you’re limiting sugar intake.
Can I double this recipe? Yes, just make sure to blend in batches if your blender isn’t large enough, and use a bigger, shallow container for freezing.
Final Thoughts
This chocolate cottage cheese ice cream has genuinely become one of my go-to healthy chocolate ice cream recipes, especially on busy weeknights when I want dessert without the guilt or the grocery store trip. It’s simple, it’s satisfying, and it proves that a cottage cheese chocolate dessert can taste just as good as the “real thing.”
If you try this recipe, I’d love to hear how it turned out for you. Drop a comment below and let me know which variation you tried, or if your family loved it as much as mine does. And if you’re on a healthy dessert kick, don’t miss our High Protein Cottage Cheese Pizza Bowl for a savory follow-up to your sweet treat.aAlways thanks to Allah who is most merciful .💖
👉🔥I hope you Must try my these recipes too
High Protein Cottage Cheese Ice Cream
High Protein Cottage Cheese Brownies
High Protein Greek Yogurt Parfait
2 Ingredient High Protein Cottage Cheese Bagels
Recipe Card
Chocolate Cottage Cheese Ice Cream
Prep Time: 10 minutes Cook Time: 0 minutes Freeze Time: 4–6 hours Total Time: 4 hours 10 minutes Servings: 6 Calories: 110 per serving Cuisine: American Course: Dessert Author: [Your Name/Blog Name]
Ingredients:
- 2 cups cottage cheese (full-fat or 2%)
- 1/3 cup unsweetened cocoa powder
- 1/4 cup milk (dairy or unsweetened almond)
- 1/3 cup honey or maple syrup
- 1 tsp vanilla extract
- 1/4 tsp salt
- 1/4 cup dark chocolate chips (optional)
- 1 tsp cornstarch or 1 tbsp cream cheese (optional)
Instructions:
- Blend cottage cheese alone for 60–90 seconds until completely smooth.
- Add cocoa powder, honey, vanilla, and salt. Blend until combined.
- Slowly add milk while blending to reach a thick, pourable consistency.
- Fold in chocolate chips by hand, if using.
- Pour mixture into a shallow, freezer-safe container.
- Cover with plastic wrap pressed onto the surface, then freeze 4–6 hours.
- Let sit at room temperature 5–10 minutes before scooping and serving.
Notes: For the smoothest texture, don’t skip blending the cottage cheese alone before adding other ingredients. Stirring once during the first hour of freezing helps prevent ice crystals.
One Comment